Every business old or new, need a strong online presence to reach out to millions of people across the globe. If you are planning to sell something then mere creating a super cool website wont suffice, you need to adopt an eCommerce platform and setup a shop online. The article “How to Setup ECommerce for WordPress Website” will take you through the exact process that is required to setup your own online shop.
Continue reading →
Quartz – Java Job Scheduling Service
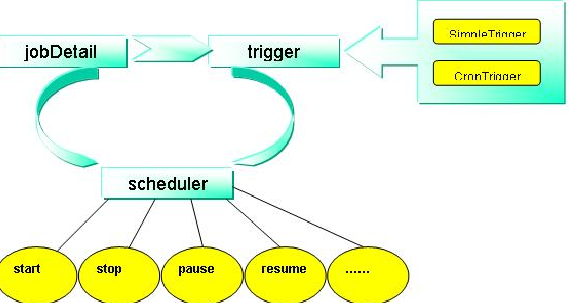
Most of the Java Projects, Enterprise Applications need some form of scheduling every now and then. People try to implement in number of ways like Timer, EJB etc. In one of my assignments I stumbled up on very interesting scheduling service known as Quartz. I was amazed by its simple but powerful implementation. Most interestingly its open source and can be integrated with virtually any Java application from the stand-alone application to the e-commerce system. Quartz supports all types of schedules, you can configure your timings from milliseconds to days to years. Quartz stands apart from other scheduling services by providing some state of the art features like Job Persistence, Transaction Support, Job Clustering, Listener Support.
Installation: Quartz get installed in matter of minutes. Only you have to download the latest jars that are available on their official site and add it to your project or application. That’s it!
Quartz allows you to divide your task in Job and run this job as per the schedule you have configured. You can uses a configuration/properties file to read the schedule. Sample properties file is shown below
|
1
2
3
4
5
6
7
8
9
10
11
12
|
#Extraction Frequency, (DAILY, WEEKLY, MONTHLY, HOURLY)
FREQUENCY = DAILY
#Day of the month in case frequency is MONTHLY
DAY_OF_MONTH = 15
#Day of the week in case frequency is WEEKLY
DAY_OF_WEEK = 1
#Hour and Minute of the day for all frequencies except HOURLY(24 Hrs Format)
HOUR = 20
MIN = 05
|
In ideal scenario, you would need a scheduler class and a job to schedule. Here I am providing sample scheduler and job which is executed by trigger we create as Hourly.
|
1
2
3
4
5
6
7
8
9
10
11
12
13
14
15
16
17
18
19
20
21
22
23
24
25
26
27
28
29
30
31
32
33
34
35
36
37
38
39
40
41
42
43
44
45
46
47
48
49
50
51
52
53
54
55
56
57
58
59
60
61
62
63
|
import org.quartz.JobDetail;
import org.quartz.Scheduler;
import org.quartz.Trigger;
import org.quartz.TriggerUtils;
import org.quartz.impl.StdSchedulerFactory;
import com.mycompany.MyJob;
public class MYScheduler {
public static java.util.Properties props = new java.util.Properties();
static {
try {
java.io.FileInputStream fis = new java.io.FileInputStream(new java.io.File(“configuration.properties”));
props.load(fis);
fis.close();
} catch (Exception e) {
e.printStackTrace();
System.out.println(e.getMessage());
System.exit(1);
}
}
public static String FREQUENCY = props.getProperty(“FREQUENCY”);
public static int DAY_OF_MONTH = Integer.parseInt(props.getProperty(“DAY_OF_MONTH”));
public static int DAY_OF_WEEK = Integer.parseInt(props.getProperty(“DAY_OF_WEEK”));
public static int HOUR = Integer.parseInt(props.getProperty(“HOUR”));
public static int MIN = Integer.parseInt(props.getProperty(“MIN”));
/**
* @param args
*/
public static void main(String[] args) {
MYScheduler scheduler = new MYScheduler();
try {
scheduler.schedule();
} catch (Exception e) {
}
}
public void schedule() throws Exception {
JobDetail myJob = MyJob.getJob();
Trigger myTrigger = TriggerUtils.makeDailyTrigger(“myTrigger”, HOUR, MIN);
Scheduler scheduler = new StdSchedulerFactory().getScheduler();
MyJobListener listener = new MyJobListener();
scheduler.addJobListener(listener);
myJob.addJobListener(listener.getName());
scheduler.start();
scheduler.scheduleJob(myJob, myTrigger);
}
}
|
Above scheduler class is creating an instance of job and a trigger to schedule the job. Job names are used so that job is uniquely identified in the schedule context. Here you will see that I am also trying to add the listener to the job. This is helpful when you want to do some another job once this is job is complete. e.g ETL. Here is the job and listener classes.
MyJob.java
|
1
2
3
4
5
6
7
8
9
10
11
12
13
14
15
16
17
18
19
20
21
22
23
24
25
26
|
import org.quartz.Job;
import org.quartz.JobDetail;
import org.quartz.JobExecutionContext;
import org.quartz.JobExecutionException;
public class MyJob implements Job {
private final static String CLASS_NAME = MyJob.class.getName();
private final static String JOB_NAME = “MyJob”;
@Override
public void execute(JobExecutionContext arg0) throws JobExecutionException {
final String METHOD_NAME = “execute”;
//perform your actual task here
}
public static JobDetail getETLJob() {
return new JobDetail(JOB_NAME, DGMEConstants.ETL_EXTRACTION_GROUP, MyJob.class);
}
public static String getJobName() {
return JOB_NAME;
}
}
|
MyJobListener.java
|
1
2
3
4
5
6
7
8
9
10
11
12
13
14
15
16
17
18
19
20
21
22
23
24
25
26
27
28
29
30
31
32
33
34
35
36
37
38
39
40
41
42
43
|
import java.util.Date;
import org.quartz.JobDetail;
import org.quartz.JobExecutionContext;
import org.quartz.JobExecutionException;
import org.quartz.JobListener;
import org.quartz.SchedulerContext;
import org.quartz.SchedulerException;
import org.quartz.SimpleTrigger;
public class MyJobListener implements JobListener {
final static String CLASS_NAME = MyJobListener.class.getName();
@Override
public String getName() {
return CLASS_NAME;
}
@Override
public void jobExecutionVetoed(JobExecutionContext arg0) {
// TODO Auto-generated method stub
}
@Override
public void jobToBeExecuted(JobExecutionContext arg0) {
try {
SchedulerContext context = arg0.getScheduler().getContext();
context.put(arg0.getJobDetail().getFullName(), false);
} catch (SchedulerException e) {
e.printStackTrace();
}
}
@Override
public void jobWasExecuted(JobExecutionContext arg0,
JobExecutionException arg1) {
//Here you can again check for schedular context and take next course of action
//e.g some database/file level logging, next job trigger
}
}
|
You can see that MyJobListener class is implementing JobListener interface and methods jobToBeExecuted and jobWasExecuted are implemented. These method will give user full control to listen to the jobs status.
Java Sorting Using Comparable
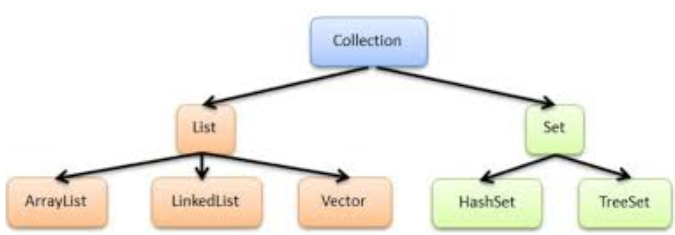
In Java you can do sorting by implementing 2 interfaces
1) Comparable
2) Comparator
Here we will see sorting example using Comparable Interface. As an example we will be sorting objects of Employee class.
When using comaprable interface make sure the object class
which you are sorting implements comaprable interface and override compareTo method correctly.
As I was more used to Java 1.4, I didnt followed any Java Generics implementation.
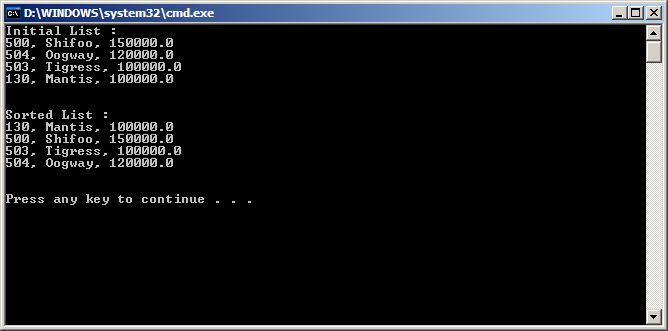
SortTest is main class that will actually create an array list and fill it with some random Employee objects.
Employee is class that will implement compare To method. I have added simple if-else control structure that will decide what to return on the basis of employee id.
less : -1 equal : 0 greater : 1
Here is the code for classes:
|
1
2
3
4
5
6
7
8
9
10
11
12
13
14
15
16
17
18
19
20
21
22
23
24
25
26
27
28
29
30
31
32
33
34
35
36
37
38
39
40
41
42
43
44
45
46
47
48
49
50
51
52
53
54
55
56
57
58
59
60
61
62
63
64
65
66
67
68
69
70
71
72
73
74
75
|
import java.util.*;
public class SortTest
{
public static void main(String args[])
{
new SortTest();
}
public SortTest()
{
//fill some employee objects
ArrayList list = new ArrayList();
list.add(new Employee(500,“Shifoo”,150000));
list.add(new Employee(504,“Oogway”,120000));
list.add(new Employee(503,“Tigress”,100000));
list.add(new Employee(130,“Mantis”,100000));
System.out.println(“Initial List :”);
print(list);
System.out.println(“n”);
Collections.sort(list);
System.out.println(“Sorted List :”);
print(list);
System.out.println(“n”);
}
public void print(ArrayList list)
{
Iterator it = list.iterator();
while(it.hasNext())
{
Employee emp = (Employee) it.next();
System.out.println(emp);
}
}
}
class Employee implements Comparable
{
public int id;
public String name;
public double salary;
public Employee(int id, String name,double salary )
{
this.id = id;
this.name = name;
this.salary = salary;
}
public int compareTo(Object object)
{
int value=0;
Employee emp = (Employee) object;
if(this.id > emp.id)
value = 1;
else if(this.id < emp.id)
value = –1;
else if(this.id == emp.id)
value = 0;
return value;
}
public String toString()
{
return this.id +“, “+this.name+“, “+this.salary;
}
}
|
- Objects should be mutally comparable. i.e you can not compare objects of different classes.
- Using comparable binds sorting to one perticular strategy.
e.g. In above example we have sorted using employee id to compare. now if we need to sort on employee name it will be difficult.
Next, I will be putting similar example using Comparator Interface.
Using .htaccess in XAMPP on Windows
I googled quiet some time on using custom links for your site on windows using XAMPP. All of them suggested me to uncomment line for ‘mod_rewrite’, set AllowOverride to All. I tried this but it still faced same issue, a 404 error page.Continue reading →
How to add Options Framework to WordPress Theme
When a WordPress Theme developer takes up any new theme development, he has to think about some neat and unique design and what all features he is going to offer in the new theme. It’s not quantity but quality and configuration usability that makes user to choose your theme over others. If you start to code for admin configuration in your theme, it will take you ages to come up with some descent design and options.
When I gave a try to WordPress theme development, first thing I looked for is that “How I am going to provide all those options which I have in mind with minimal code?” I stumbled up on few plugins that were available in market and could have worked very well with my theme. Of all such plugins one stood out in simplicity and functionality and that is Options Framework Plugin . The Options Framework Plugin makes it easy to include a full featured options panel in any WordPress theme.
My aim was to use same functionality as an in-built feature of my theme and not as a plugin. This would have saved a great deal of time of theme. So I did some search and trials and I was able to implement the framework inside my theme. I am going to share the same here in this article.
First you need to copy the plugin copy from GitHub to your local drive. Once you have the zipped archive on your machine, unzip it and copy files and folders as displayed in below image to to one “admin” folder.
Next task is to initiate the framework and provide options.php to this framework. Basically this framework uses a php file to get its options data. By default the name of the file is “options.php” but you can override this by simply adding simple filter. Now I will show you my theme’s includes/inc folder where I am going to put above admin folder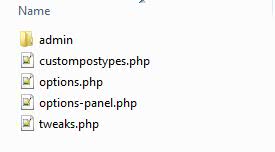
You can see I have one “options-panel.php” which is going to initiate the framework and “options.php” which stores my actual options. Here is the code for framework initiation
|
1
2
3
4
5
6
7
8
9
10
11
12
13
14
15
16
17
18
19
20
21
22
23
24
25
26
27
28
29
30
31
32
33
34
35
36
37
38
39
40
41
42
43
44
45
46
47
48
49
50
51
52
53
|
<?php
/*
* Loads the Options Panel
*
* If you’re loading from a child theme use stylesheet_directory
* instead of template_directory
*/
if ( !function_exists( ‘optionsframework_init’ ) ) {
define( ‘OPTIONS_FRAMEWORK_DIRECTORY’, get_template_directory_uri() . ‘/inc/admin/’ );
require_once dirname( __FILE__ ) . ‘/admin/options-framework.php’;
require_once dirname( __FILE__ ) . ‘/custompostypes.php’;
}
/*
* This is an example of how to add custom scripts to the options panel.
* This one shows/hides the an option when a checkbox is clicked.
*
* You can delete it if you not using that option
*/
add_action(‘optionsframework_custom_scripts’, ‘optionsframework_custom_scripts’);
function optionsframework_custom_scripts() { ?>
<script type=“text/javascript”>
jQuery(document).ready(function() {
jQuery(‘#example_showhidden’).click(function() {
jQuery(‘#section-example_text_hidden’).fadeToggle(400);
});
if (jQuery(‘#example_showhidden:checked’).val() !== undefined) {
jQuery(‘#section-example_text_hidden’).show();
}
});
</script>
<?php
}
/*
* Loads the Options From Different Location as per themes requirement
*
*/
function mytheme_options_framework_location_override() {
return array(‘/inc/options.php’);
}
add_filter(‘options_framework_location’,‘mytheme_options_framework_location_override’);
?>
|
The code is simply locating the options framework and invoking i. The above code also shows you how to put in the filter to override the options file name. Now this framework supports almost all of the options types, these are listed below
- text
- textarea
- checkbox
- select
- radio
- upload (an image uploader)
- images (use images instead of radio buttons)
- background (a set of options to define a background)
- multicheck
- color (a jquery color picker)
- typography (a set of options to define typography)
- editor
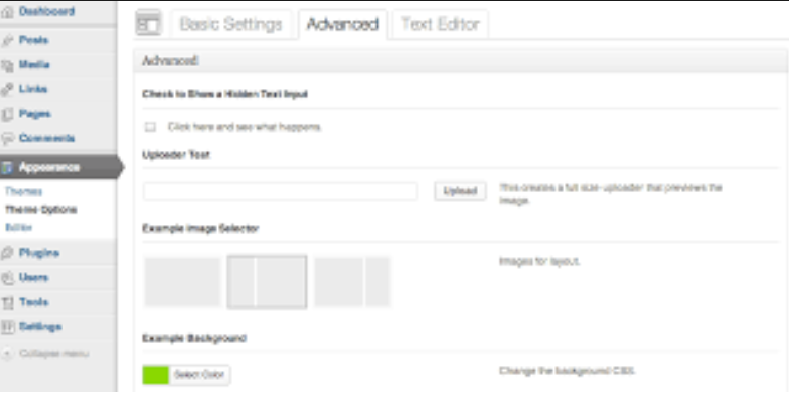
The framework provides you nicely grouped options. All options belonging to one group are displayed in one tab. Tabs shown as below.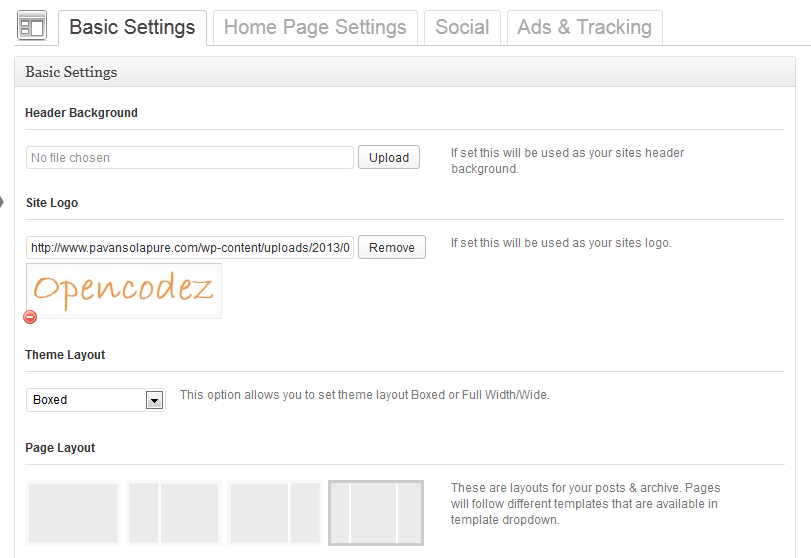
And above can be achieved using the options.php
|
1
2
3
4
5
6
7
8
9
10
11
12
13
14
15
16
17
18
19
20
21
22
23
24
25
|
//Settings for Basic Settings Tab
$options[] = array(
‘name’ => __(‘Basic Settings’, ‘options_check’),
‘type’ => ‘heading’);
$options[] = array(
‘name’ => __(‘Header Background’, ‘options_check’),
‘desc’ => __(‘If set this will be used as your sites header background.’, ‘options_check’),
‘id’ => ‘header_background’,
‘type’ => ‘upload’);
$options[] = array(
‘name’ => __(‘Site Logo’, ‘options_check’),
‘desc’ => __(‘If set this will be used as your sites logo.’, ‘options_check’),
‘id’ => ‘site_logo’,
‘type’ => ‘upload’);
$options[] = array(
‘name’ => __(‘Theme Layout’, ‘options_check’),
‘desc’ => __(‘This option allows you to set theme layout Boxed or Full Width/Wide.’, ‘options_check’),
‘id’ => ‘theme_layout’,
‘std’ => ‘Boxed’,
‘type’ => ‘select’,
‘class’ => ‘mini’, //mini, tiny, small
‘options’ => $theme_layout_array);
|
The first element with type as heading will be treated as one tab and all other options that follows will be added under that tab till we encounter next element of type heading. Isn’t it easy? Now if you want to add next tab, just add one more element with type heading in and you will get your next tab. e.g.
|
1
2
3
4
5
6
7
8
9
10
|
$options[] = array(
‘name’ => __(‘Home Page Settings’, ‘options_check’),
‘type’ => ‘heading’);
$options[] = array(
‘name’ => __(‘Settings for Slider on Home page’, ‘options_check’),
‘desc’ => __(‘Check to display Slider. Defaults to true.’, ‘options_check’),
‘id’ => ‘display_slider’,
‘std’ => ‘1’,
‘type’ => ‘checkbox’);
|
You can find details of other options that is available in the downloaded folder. With all this information I think you will be able to add options framework to your theme with ease and make your theme powerful than ever.
Top 5 Best Responsive CSS Frameworks for Web Design
After developing two WordPress themes based on responsive css frameworks, I believe I should put in my opinion on which framework I felt is more user friendly. I am going to start a new WordPress theme which uses Foundation CSS Framework and then I will a try to Twitter Bootstrap Framework and develop the Theme. In this article I will be concentrating more on these 2 frameworks but we will review other frameworks that are available in market.Continue reading →
3 Tips to Help You Simplify Your Web Design
When it comes to web design, the saying ‘less is more’ could not be truer. Simplicity is key, as it provides an all-around easier to use design for the user, helps to reduce confusion with navigation, and makes the website look sleek and professional. In turn this can help to produce more of your desired results – for example, more signups, better sales of products, and visitors staying on your site for longer. But, what if whatever you do, you simply can’t get the sleek, simple, minimalist looking result that you desire. There’s no need to worry as by following some simple steps, you’ll be able to simplify your website and start seeing results. Here are some tips.
Photo by tiramisustudio at freedigitalphotos.net
Focus on the Essentials
There are a number of cool elements that can be added to websites that aren’t absolutely necessary and can often cause a cluttered looking interface if overused or not used correctly. Unfortunately, many web designers fall foul to these features, thinking that by adding them, the website will look better – a result that is not always the case. This is why when designing a simple website, any good web designer (such as those at Sioux Falls web design) will tell you that you should concentrate only on the bare essentials. The 80-20 rule is a great way to go about achieving this result. When designing your site, focus on the 20% that is delivering 80% of usefulness – this could be reviews, media badges, an online store button, or a subscribe form. The fewer distractions there are on your website, the better chance it has of doing well.
Less Pages
The more pages that your website has, the harder it will be to navigate around, meaning that many users might be put off visiting or staying on your page for long. Having fewer places to explore and less clicks is a key element of simplifying your website design, and you can do this by either merging multiple pages into one, or trimming away pages that aren’t absolutely needed. A great way to do this is to imagine that you are the customer – if you visited your website, what would be the key things that you’re looking to do? Once you’ve determined what it is that your customers want to find out when they visit your site, you’ll know which pages to keep, and which can go.
Limit Colors
With so many color choices out there, it’s easy to see why many web designers can get carried away when designing the color scheme of a site. However, using too many colors can simply become a distraction, so it’s important to choose no more than two or three complimenting colors to keep your website looking sleek and simple. Using different shades of the same color, for example, light blue and dark blue, adds more subtlety to your site.
If you’re a web designer who’d like to add any tips to the above list, we’d love to hear from you in the comments.
Working For Yourself. No, It’s Not Easy
Being an entrepreneur, on any level, is tough. It takes a lot of attention, focus, self-esteem, and drive. All of these elements go into your will, and it’s your will that guides you forward in your life. There are plenty of things that cause people to struggle in the world of working for oneself. We get lazy, distracted, and lose focus in so many other ways. But if you’re a solopreneur, even if you’re just a freelancer, your success, at the end of the day, comes down to you. So how do we stay motivated? How do we maintain the drive to succeed? It’s different for everybody, but here are a few ways.Continue reading →
How to Learn Internet Marketing
Learn every detail about internet marketing
Significance of internet marketing to your business might be change depend on your product or service. However, it is obvious that internet is getting bigger than ever in every single day and even right now, there are millions of products and services you can get by just using the internet. So, the importance is obvious.
Continue reading →
Four Fundamental Principles of HTML Email Template Design
 HTML email continues to prove itself as a viable tool for businesses who want to communicate with their audience in an effective, and relatively inexpensive way. For the email marketer, it has become an indispensable weapon that often means the difference between failure and success. Although more customers and subscribers are demanding HTML email, ensuring seamless compatibility across the array of mail clients and web browsers can make actually designing the template a nightmarish experience. Don’t fret. We have listed four of the best practices you can use to guarantee a great design.
1. Create Your Email with a Good HTML Editor
We all know that most email readers excel at sending and receiving email. That is what they are made for, so that is what they are good at. Unfortunately, many do not realize that these programs are not great at creating HTML email, even though they may support the format. We strongly suggest that you do not design your template with a typical mail client such as Eudora or Microsoft Outlook. By doing so, you run the risk of ruining the format of the message for your recipients using different mail reading programs. Luckily, there are many capable HTML editors on the market, and all are geared to simplify the design process and help you create messages that are compliant with web standards.
2. Build Your Layout with HTML Tables
You can discover a range of design possibilities that can be easily coded by using HTML tables for your layout. These tables make it easier to break your space into columns and rows, allowing you to add streamlined organization to your template. They can also help weed out some of the problems caused by different email readers and how they render HTML code. While some designers may prefer more advanced methods that call for coding to the latest standards, using tables doesn’t necessarily mean you have to revert to the primitive days of HTML programming. The fact that so many clients support HTML today increases the chances that your tables will display just fine.
3. Understand General CSS Guidelines
If you are a proficient HTML designer, you may be used to creating a separate CSS file that contains the formatting instructions for tags, and referencing that file through a link in the head section of a web page. Although this works fine in most locally operated mail programs, it usually does not carry over to web-based mail. For example, Hotmail requires that CSS be spelled out in the body, Yahoo mail needs it spelled out in the head, and Gmail only offers support for inline CSS. These are just a few of many reasons why designing HTML email with CSS can be very frustrating. There are, however, several ways around them. If you carefully format your CSS with semantic markup, email readers that only ignore some of its features will likely downgrade your message to an Rich Text Format (RTF) look without ruining your links.
4. Simplicity is Power
When designing your HTML email template, try your best to the keep the formatting as simple as possible. The technology itself is ideal for incorporating things like images, Flash animation and forms, but you should never let these dynamic features hinder the effectiveness of your message. The more complex HTML gets, the more it degrades in performance and turns off the reader. You must also keep in mind that some mail clients may not work in perfect harmony with certain features. This should give you all the more reason to keep your design simple and effective.

